
Things to ensure before we start the process:
-
A user(trainer/student) must have a valid Queensford College email address.
-
A user must have a laptop/computer with Internet in order to run virtual classes on Microsoft Teams with mic inbuild (for laptop), for desktop (must have headphones)
-
Speaker /Mic/ Webcam (Optional)
How to start using Teams:
2 How to communicate with your Groups in Teams
2.1 Using Online Web Version of Microsoft Teams
2.2 Using Desktop Version of Microsoft Teams
3 How to start meeting or scheduling a meeting in a Microsoft Teams
4 How to use Calendar in Teams
5 Additional Information
5.1 How to create groups in Teams (Optional) only do if you need to create separate teams for students:
5.2 How to share PowerPoint, share the desktop while using teams
5.3 How to start the recording in Teams
5.4 How to mute participants in Teams
5.4.1 Mute yourself
5.4.2 Prevent unmuting
5.4.2.1 Before the meeting
5.4.2.2 During the meeting
5.4.2.3 Requests to speak
5.4.2.4 Allow unmuting
5.5 How to use teams in Mobile phones/Desktop/Browser
5.6 Related articles
How to start using
How to start using Teams:
1.Log in to Login | Microsoft 365 with your Queensford email address and password
2. Once logged in, click on the 9 dots square icon on the top left-hand corner:

3. Click “Teams” to access the platform

4.The below image is the team’s group that I am currently in which will differ from user to user.

5. If you are using Laptop/desktop computer, you can simply click on your profile in top-right hand corner in the Microsoft Teams web page from where you can download the Microsoft Teams in your computer.

6.After the software has been downloaded, please install it in your system and sign in.
How to communicate with your Groups in Teams
All the users who are part of the group have been enrolled in teams and all the trainers have been allocated as owners of those group.
This means the owner(trainer) has the permission to add users in the Microsoft Teams groups and remove from the group as well.
Using Online Web Version of Microsoft Teams
1.To start communication on your Teams groups, simply click on the Teams groups and click on General as shown in below image.
2.On the page, you can see all the buttons who has the feature included: like chatting in the group, calling and scheduling a meeting as well.

3. Now, if you would like to send some message in the group, you can simply start a new conversation as specified in the blank text message box.
4.If you want to check who are the users in the group, simply click on 3 dots on the side of your group and click on “Manage teams” like below:

-
You can add member or see who the members in your group as in below image:

-
If you would like to communicate with one of the students personally, you can click on chat and talk one to one or if required call one-to one.
Using Desktop Version of Microsoft Teams
After you have downloaded and installed the Microsoft Teams, please open Microsoft Teams in your computer and sign in via your Queensford email address.

After this, simply follow the steps that is being specified in Step 4.
How to start meeting or scheduling a meeting in a Microsoft Teams
-
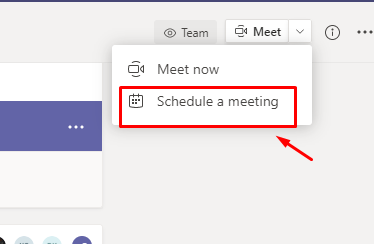
Click on “Meet” button that is been specified in the below image. It is located on the top right-hand corner in the Teams group.

-
If you want to the meeting to start right now, you can simply click on “Meet now”

-
But, if you want to schedule a meeting-choose a different date to organize the session, please click on “Schedule a meeting”.
Please specify the Title for the meeting and date, details for the meeting.
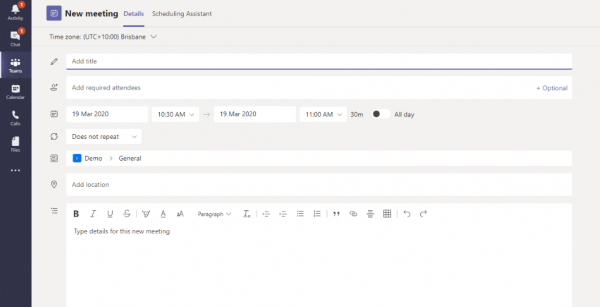
Please note: All the users have already been added in the group, so no need to add required attendees now, however, if someone is missed, you can simply add in the “Add required attendees”.
How to use Calendar in Teams
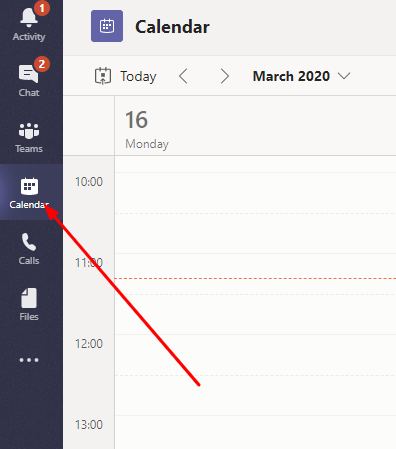
If you want to schedule a meeting for future via teams, please click on “Calendar” on left-hand section.

If you have setup Microsoft Teams meeting before, you can see the meetings in your calendar from where you can jump into meetings.
If you want to schedule a new meeting for next day or so, please choose a date and specify the parameter.
In the channel section, specify your group name (ask IT for confirmation) and meeting will be created on that channel (which is your group).
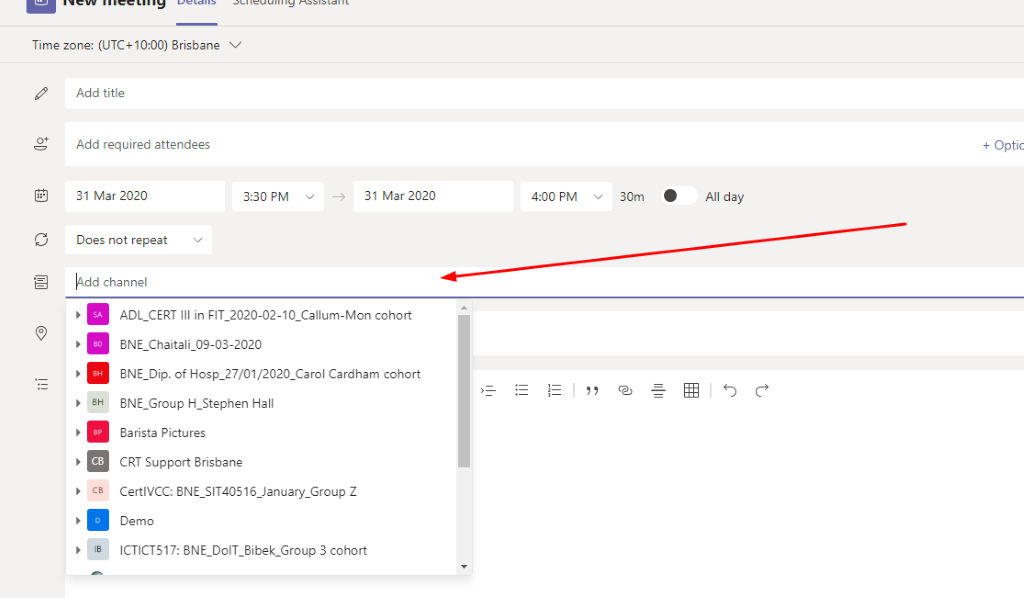
Please note: Your groups have already been created by IT, so no need to add any members at the moment, please follow above instructions to call on teams, however, if you have changed the timing, then change the date and time from schedule a meeting section.
Additional Information
How to create groups in Teams (Optional) only do if you need to create separate teams for students:
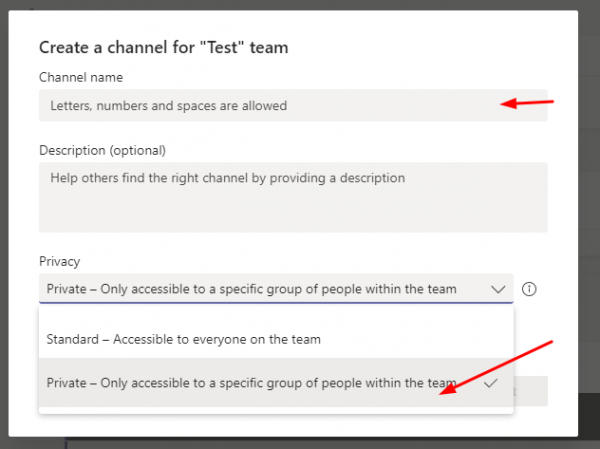
Depending on the courses that you are delivering, you might have to make groups for students so that they can work as a team in separate.
To do that: we need to add different channels in the Teams group.
Step 1: Go to your group and click on 3 dots at the side.
Step 2: Give a name of the channel and set the privacy as private.

Step 3: After the channel has been added, please add the members in that group.
How to share PowerPoint, share the desktop while using teams
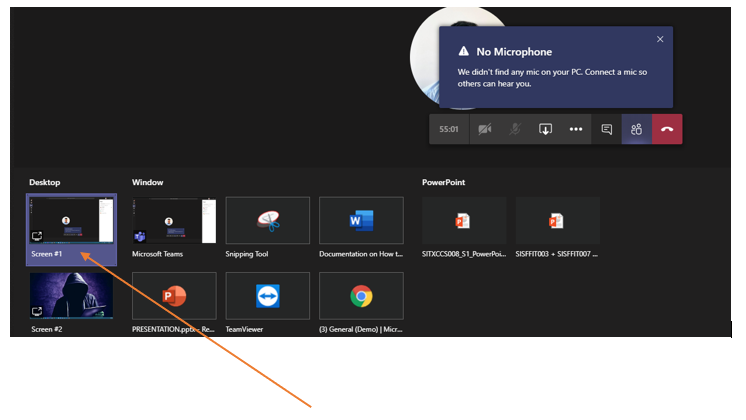
After you click on Meet now/Join Now, please click on
Desktop-if you are wanting to share your whole screen.
Window-if you want to share your specific window to others.
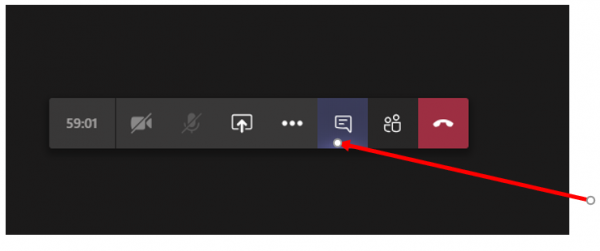
If you want to communicate via messaging to the group, please click on “Show conversation” as shown below:
How to start the recording in Teams
Step 1: If you want to keep a recording of the meeting, you can simply click on 3 dots and start Recording which will start the recording and you can share later with the members.
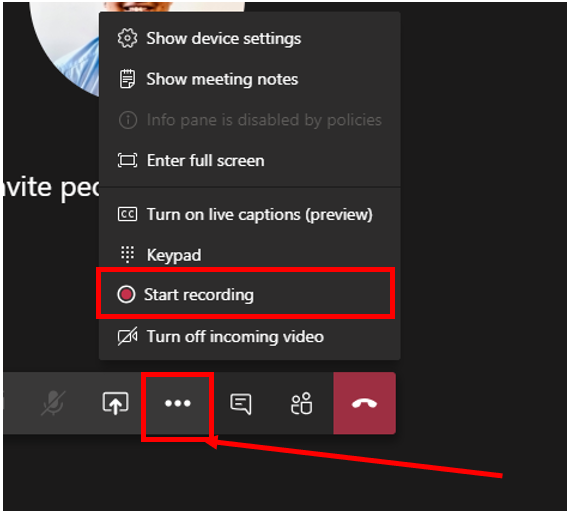
Step 2: After the meeting has been finished, please click on Stop recording.
The recording has automatically been saved in our server which can be accessed anytime as long as you have started the recording.
How to mute participants in Teams
- Mute yourself!
If you want to mute yourself for a while or you don’t want other participants to hear your private conversation, simply click on Mic button as shown in the picture below.

When you finished, click Unmute button.

- Prevent unmuting!
Before the meeting
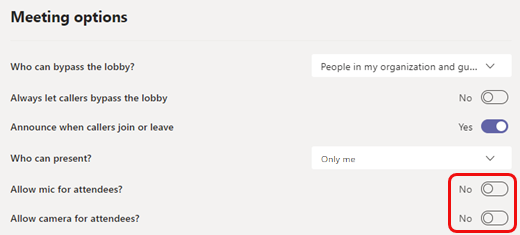
After scheduling the meeting and sending out the invites, the meeting organizer can turn off the mics so that attendees can’t unmute themselves during the meeting. All attendees (but not presenters) will be muted when they join the meeting.
Go to Calendar and double-click the meeting.
Select Meeting options near the top of the screen.

Turn off the Allow attendees to unmute toggle and select Save.
During the meeting
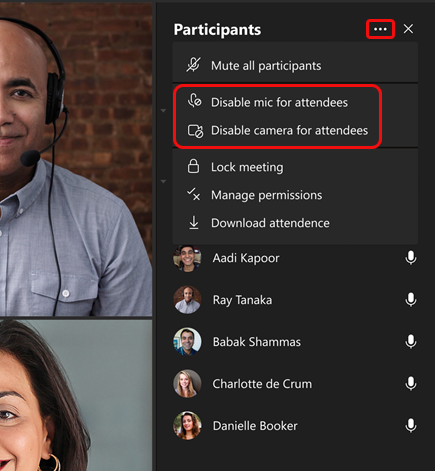
The organizer and presenters can prevent attendees from unmuting at any time during the meeting.
Select More options and click on 3 dots next to Participants and then select Don’t allow attendees to unmute.
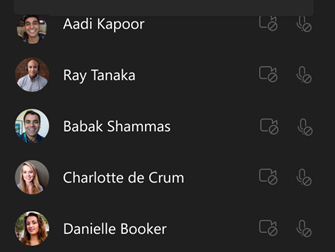
Attendee mics will appear dimmed.
Alternatively, you can mute all the mics without preventing unmuting by selecting Mute all participants under Participants.
Requests to speak
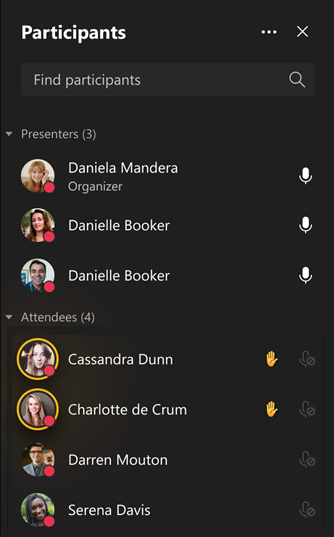
Attendees who can’t unmute can raise their hands to request to speak.
Allow unmuting
Point to a raised hand, select More options and click on 3 dots, and then select Allow to unmute.
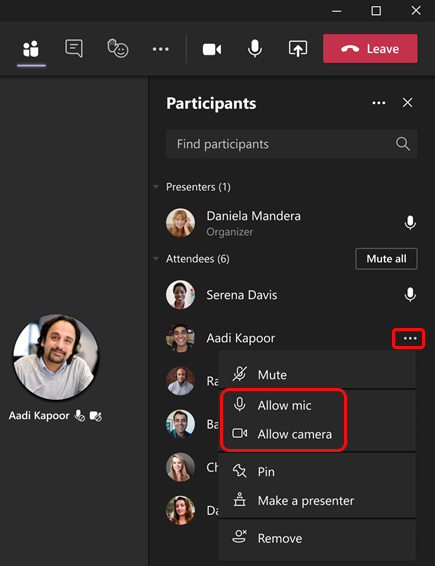
The attendee can now unmute.
How to use teams in Mobile phones/Desktop/Browser
To download Teams for Desktop/laptop, please click below:
Download Microsoft Teams for Desktop
If want to use teams in the mobile or iPad can download it from App Store or Google Play and search for Microsoft Teams.
To more about on teams: please visit the link here.